RE: Pseudo-reflections in TRII on Psx - the code
Remember that article : https://schnappy.xyz/?tr2_not_shaders ?
That concluded on the somewhat disappointing statement that I didn't know exactly how it's done...
Well after a year and a half of PSX development, I think I've got what it takes to explain it in more details.
Obviously, you should read the first part if you want to know what I'm on about.
Pseudo-reflection needs framebuffer
As was pointed out by @sickle and Paul Douglas, it's a trick with the framebuffer that allows this nice effect.
The PSX vram
Basically, the VRAM on the psx is a 1024x512 pixels image where you can load graphical stuff like textures, palettes and fontmaps. You also have to reserve and area where you will draw the final image that appears on the screen.
On the PSX you can use values from 256x240 to 640x480. But as you can guess, the more space you take for your drawing area, the less space you have in vram to load stuff.
The drawing area is defined by a DRAWENV and the display area (which defines what portion of the vram should be displayed) is defined by a DISPENV.
Double-buffering setup
Declaring the buffers:
DISPENV disp[2];
DRAWENV draw[2];
short db  = 0; // Will flip between values 0 and 1
Setting the double buffers :
// Set a dispenv at 0,0 and at 0,240
SetDefDispEnv(disp[0], 0, 0, 320, 240);
SetDefDispEnv(disp[1], 0, 240, 320, 240);
// Set a drawenv at 0,240 and at 0,0
SetDefDrawEnv(draw[0], 0, 240, 320, 240);
SetDefDrawEnv(draw[1], 0, 0, 320, 240);
and switching the buffers:
while(1){
    PutDispEnv(disp[db]);
    PutDrawEnv(draw[db]);
    // Flip db value if 0 = 1, if 1 = 0
    db = !db;
}
Double buffering is a way of interverting the DRAWENV and the DISPENV positions in vram, so that one is displayed, while the other one is drawn.
Here is the content of the vram :

As you can see, two similar frames are stacked on the leftmost of it, and these are the draw areas. You can also see that some text is apparent on only one of the frames, and that is because the debug font will only display on the current display area.
The funny stuff on the rigth are textures and the debug fontmap.
Quick note : Coordinates in vram are Top Left 0,0, Bottom Right 1024,512.
So this helps us determine that at this point in execution, the current DISPENV has it's vram coordinates to 0,0, and the DRAWENV has it at 0,256.
Using textures
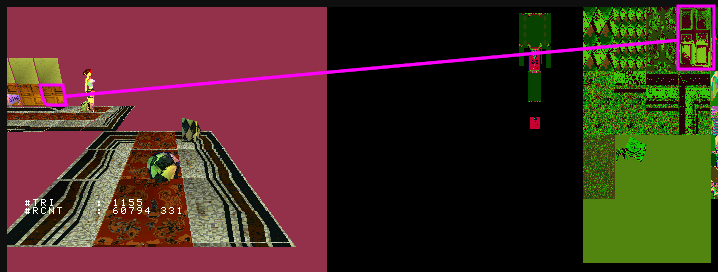
On PSX, textures are applied on primitives by using UV coordinates. This means that for each vertex that has 3D coordinates in the 3D world you're simulating, you specify a 2D coordinate in vram. That way, you 3D object will map to your 2D texture image.
For example in the following image, you can guess that the texture used on the wall is the one you can see in that pink rectangle on the right ;
So what if instead of giving the textures coordinates, we gave arbitrary coordinates in the vram ? We could use the current DRAWENV as a texture for example ?
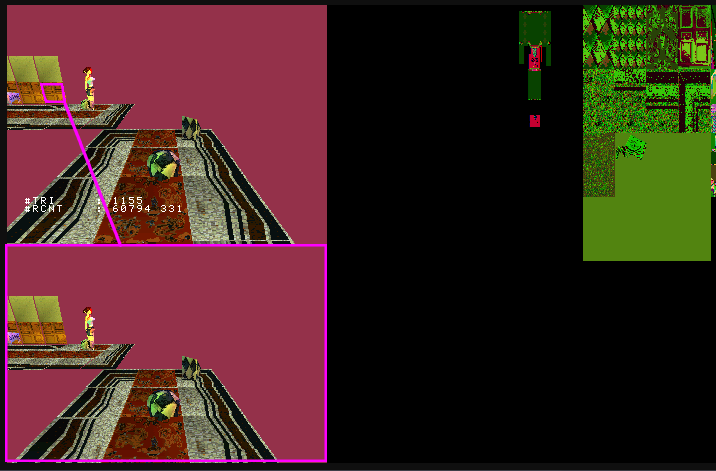
Yup, that's exactly what we're going to do !
There is one problem with that approach though.
The vram is cut in 256x256 pixels pieces called Texture Pages in PsyQ world, so if you want to access a texture that's at 0,320, then a texture that's at 256,640, you have to change the current texture page, which takes time.
Plus, a TPage is only 256 pixels wide, whereas our DISP/DRAW envs are 320 pixels wide, so we have a problem on the X axis !
Instead of switching TPage, which is slow, we'll re-scale the values that span from 0 to 320 between 0 and 256.
Mapping an area to a smaller one in fixed point math can be done with :
( xcoord * ( smallerAreaWidth * scaleValue ) / greaterAreaWidth ) / scaleValue
which in our case gives :
( xcoord * ( 256 * 4096 ) / 320 ) / 4096.
We'll be using bitshift's >>12 as equivalent to /4096.
On the Y axis, another problem arises : it's fine for the first TPage, that spans from 0 to 240, but what about the ne that spans from 240 to 480 ?
We're going to have a 16 pixels offset that will make the reflection appear jumpy, which is not good.
In order to solve that one, we're going to have to add a 16px offset only when the bottom area is used as DRAWENV. Fortunately, we can know when it is by checking db's value.
The code
Texturing a primitive with PsyQ's libraries is basically:
// Set primitive
SetPolyGT3(primitive);
// Change texture page : in the example above, tpage is at 0, 640 in vram
primitive->tpage = getTPage( texture.mode, 0,
                             texture.prect->x, // 0
                             texture.prect->y  // 640
                            );
// We should load the CLUT to vram here if needed.
// Set UV coordinates for 3 vertices
setUV3( primitive,
        texture.vx, texture.vy, // Vertex 1
        texture.vx, texture.vy, // Vertex 2
        texture.vx, texture.vy  // Vertex 3
        );
}
So that's pretty straight forward. Changing the texture to the current DRAWENV would mean doing:
// Change TPage to current DRAWENV - here 'db' is a value that flips between 0 and 1 and is used as the DISPENV/DRAWENV array's index.
setTPage( poly4, 2, 0, 0, !(*db)<<8);

// Map coordinates from drawarea (320x240) to texture page size (256x256) in fixed point math
// x = x * (256 / 320) => ( x * ( 256 * 4096 ) / 320 ) / 4096 => x * 3277 >> 12
// y = y * (240 / 256) => ( y * ( 240 * 4096 ) / 256 ) / 4096 => y * 3840 >> 12
setUV3( primitive,
        // Scale coordinates on X axis
        (primitive->x0 * 3277) >> 12,
        // Scale coordinates on Y axis, and add offset when !db
        ((primitive->y0 * 3840) >> 12) - (!(*db) << 4),
        (primitive->x1 * 3277) >> 12,
        ((primitive->y1 * 3840) >> 12) - (!(*db) << 4),
        (primitive->x2 * 3277) >> 12,
        ((primitive->y2 * 3840) >> 12) - (!(*db) << 4)
    );
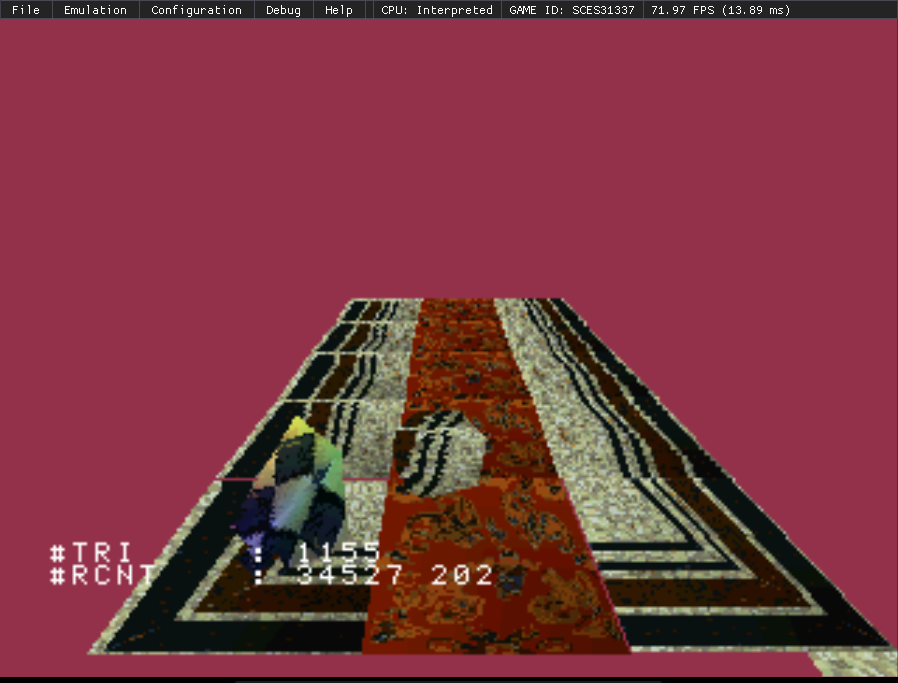
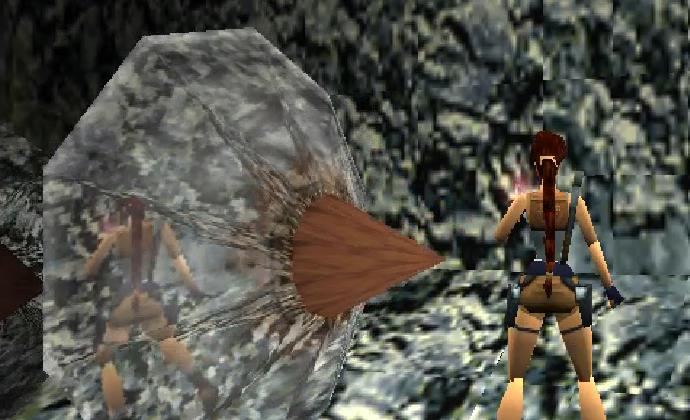
With this trick, we already have a nice kinda-refracting-looking effect :
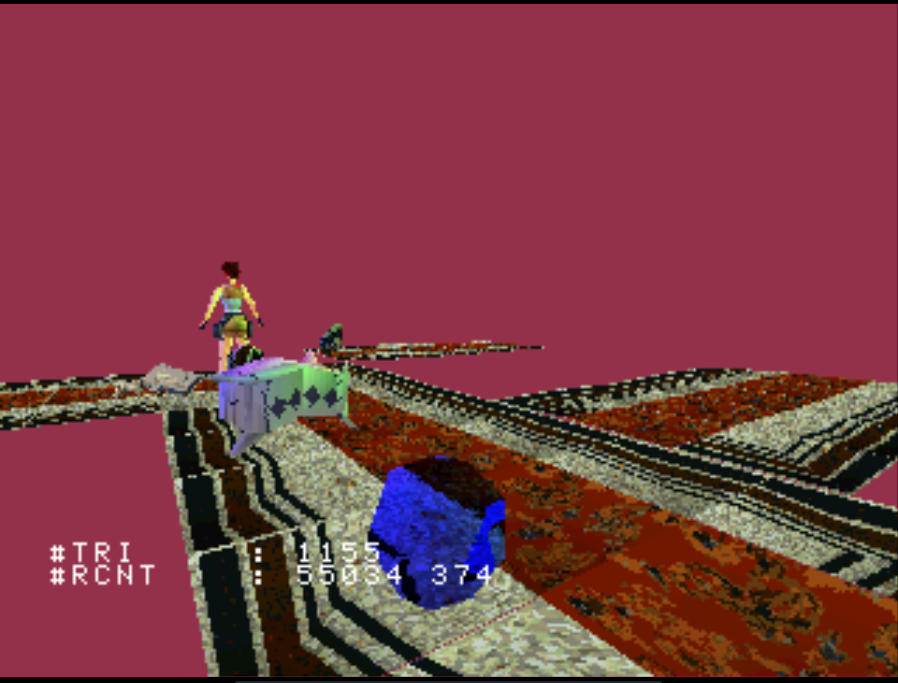
Now we'd like to add a color hue to it, to have that nice blue crystal look.
Well instead of using the vertex colors that are stored in the level for this specific object, we'll use a custom one, and perform the local color operations on that :
    // Add color tint - nice blue color
    CVECTOR prismCol = {0x40,0x40,0xff,0x0};
    // work color vectors
    CVECTOR outCol, outCol1, outCol2;
    // Find local color from normal and prismCol
    gte_NormalColorDpq3( primitive->n.vx,
                         primitive->n.vz,
                         primitive->n.vy,
                         &prismCol,
                         primitive->p,
                         &outCol,
                         &outCol1,
                         &outCol2
                        );
    // Set colors
    setRGB0(poly, outCol.r, outCol.g  , outCol.b);
    setRGB1(poly, outCol1.r, outCol1.g, outCol1.b);
    setRGB2(poly, outCol2.r, outCol2.g, outCol2.b);
And voilà :
Semi-transparency
In this pic, you can see that Lara's reflection looks cloudy. This could be because a second primitive with semi-transparency is drawn above the one doing the reflection. This is further described in this article :
https://schnappy.xyz/?tr2_not_shaders-part3
Links and notes
Original article : https://wiki.arthus.net/?tr2_not_shaders
Thanks to psxdev users gwald and sicklebrick, and to Paul Douglas for their time and answers.