Connect a PSX to a Rpi's GPIO serial over the network to use with nops
On the rpi with a fresh raspios install
0. Optional
Connect your RPI to the network, enable ssh login, then log in and do the following steps from your computer.
You can enable ssh right after flashing your sdcard by creating an empty file named ssh on the /boot partition :
# Find mount folder :
lsblk | grep mmcblk0p1
├─mmcblk0p1    179:1    0   256M  0 part /run/media/user/boot
# Create empty file
touch /run/media/user/boot/ssh
Plug & Connect to the rpi :
ssh pi@YOUR_PI_IPIf you don't have/want to use your network, see the bottom of this page for setting a direct cable connection between your station and the rpi
1. Enable serial port
but not the serial shell :
https://www.raspberrypi.org/documentation/configuration/uart.md
- Start raspi-config: sudo raspi-config.
- Select option 3 - Interface Options.
- Select option P6 - Serial Port.
- At the prompt Would you like a login shell to be accessible over serial? answer 'No'
- At the prompt Would you like the serial port hardware to be enabled? answer 'Yes'
- Exit raspi-config and reboot the Pi for changes to take effect.
On Rpi 3B, 3B+, 3A+, 4B and Zero W, you need to disable the bluetooth in order to be able to use the PL011 module. This is done by using an overlay.
In the /boot/config.txt file, add the line :
dtoverlay=disable-btthen reboot.
2. Install ser2net
sudo apt-get install ser2net -y3. Edit /etc/ser2net.conf and replace the lines at the end with:
On the rpi, the serial device is exposed at /dev/ttyAMA0 :
5020:telnet:0:/dev/ttyAMA0: remctl NONE 1STOPBIT 8DATABITS RTSCTS HANGUP_WHEN_DONE4. Add pi user to the tty group :
sudo useradd -G tty pithen log out (ctrl-d) and in again for the change to take effect.
5. Restart ser2net service
sudo systemctl stop ser2net.service
sudo systemctl start ser2net.service
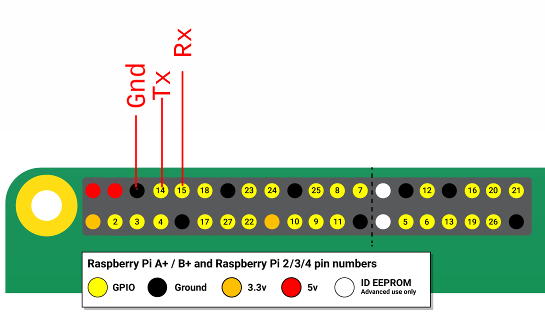
6. Connect your PSX to the Rpi
Plug the PSX's serial output Rx/TX/Gnd to the GPIO14/pin 8 (Tx), GPIO15/pin 10 (Rx) and pin 6 (Gnd).
On the Rpi

On the PSX
  5 RXD receive data     _________________
  8 TXD transmit data   |                 |
  2 GND Ground          | 1 2 3 4 5 6 7 8 | <- That's looking at the console from the rear, with the PIO on the left, and A/V on the right.
                        |_________________|
source : https://psx-spx.consoledev.net/pinouts/#pinouts-sio-pinouts
On the Linux client
1. Install ttynvt
First, we're going to need some tools and dependencies :
sudo apt-get install -y git autoconf libfuse-devThen, proceed to download and compile ttynvt :
 git clone https://gitlab.com/lars-thrane-as/ttynvt.git
 cd ttynvt
 autoreconf -vif
 ./configure
 make
 sudo make install
2. Create the virtual serial port
Adapt YOUR_PI_IP to your network setup.
sudo ttynvt -M 199 -m 6 -n ttyNVT0 -S YOUR_PI_IP:5020This will create a device /dev/ttyNVT0 that you can use with nops like a regular serial port.
Optional : Add your user to the group that owns the device if you have access troubles :
sudo useradd -G `ls -lah /dev/ttyNVT0 | awk '{print $4}'` `whoami`Then log out and in again.
Direct connection using a lan cable
Don't have a network or don't want to use it ? We can set the rpi up to distirbute ip adresses and act as a dhcp server,
allowing a direct connection between your computer and the rpi via a lan cable.
The following steps will prevent your rpi from getting an IP adress on your LAN if you connect it.
1. Set a static IP adress on the rpi
In /etc/dhcpcd.conf, uncomment lines 44 to 48:
sudo nano /etc/dhcpcd.confto get something like this :
interface eth0
static ip_address=192.168.10.1
static routers=192.168.10.1
static domain_name_servers=192.168.10.1
2. Setup the dhcp server
sudo apt-get install -y dnsmasq
sudo nano /etc/dnsmasq.conf
Add the following lines at the end of the file
interface=eth0
bind-dynamic
domain-needed
bogus-priv
dhcp-range=192.168.10.0,192.168.10.10,255.255.255.0,12h
It's important that the static IP you set in dhcpcd.conf is in the dhcp-range of dnsmasq but not the first one in this range as this will be the broadcast address.
3. Reboot :
sudo rebootConnecting à lan cable between your station and the rpi should provide your machine with an ip in the range 192.168.10.2-192.168.10.10. Follow the instructions above adapting them with this IP.
Sources
https://github.com/JonathanDotCel/NOTPSXSerial
https://gitlab.com/lars-thrane-as/ttynvt
https://www.raspberrypi.org/documentation/usage/gpio/
https://www.raspberrypi.org/documentation/configuration/uart.md
https://lesser-evil.com/2013/04/raspberry-pi-ser2net-cheap-nm16a-serial-console-server/
https://linux.die.net/man/8/ser2net
https://github.com/cminyard/ser2net
https://raspberrytips.com/dhcp-server-on-raspberry-pi/